Application guide by addaScanCompare the inspection task, imaging conditions and validation steps with your own production line.
- Inspection task
- Battery-tab code reading
- Decision focus
- battery-tab code reading
- Station planning
- Fit the optical path as well as the reader body
- Illustrative scenario
- three no-reads with different remedies
Reader access and code contrast on reflective battery tabs
The application images show the physical product and imaging conditions. The engineering diagram below explains the inspection logic and recovery decisions.
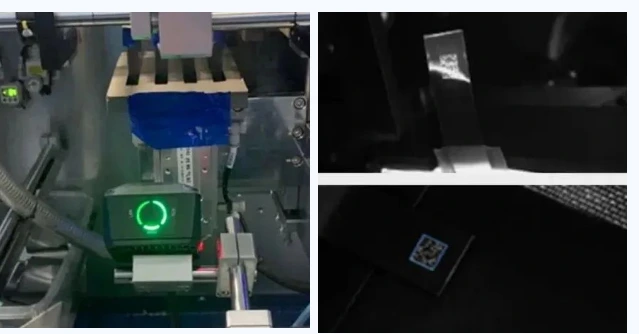
These views contrast the installed reader and selected code images.
Select an image to view it at full size.
Why does a flat tab read while a curled tab does not?
Swipe across the table to compare all columns →
| Condition | Approach to evaluate | Selection check |
|---|---|---|
| Flat tab, clear mark | Evaluate a compact fixed reader. | Check module detail at the available distance. |
| Specular reflection | Compare polarised and unpolarised images. | Verify contrast and available exposure together. |
| Curled tab | Test depth of field and viewing angle. | Include the full permitted curl range. |
Fit the optical path as well as the reader body
Draw the installation envelope with the reader, illumination, connectors, moving tooling and service access. Then locate the nearest and farthest allowed code surfaces. Working distance and depth of field must cover that range while preserving detail in the smallest code modules. Enlarging the view to tolerate movement also reduces the pixels available to each module for a given sensor.
Polarisation may suppress a reflection but also reduces received light. If exposure is lengthened to compensate, the moving tab can blur. Compare the same mark under each lighting option at production motion, not only while stationary. A compact fixed reader is a useful starting point for identity alone. External optics or a camera system become relevant when clearance, viewing direction or additional appearance checks exceed what the reader arrangement can deliver.
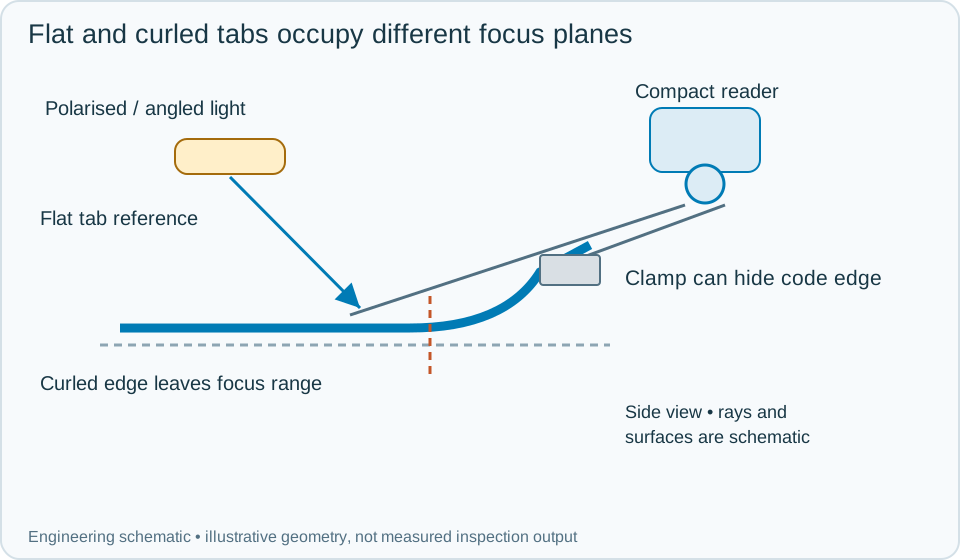
On a small screen, scroll across the diagram to inspect the labels.
Worked example: three no-reads with different remedies
An illustrative flat tab has sharp modules and decodes. When curled, its centre remains visible but one edge becomes soft: test focus across the allowed height envelope. A second tab shows sharp surrounding detail but a white patch erases modules: compare lighting angle and polarisation, then recheck motion exposure. A third has part of the symbol behind a clamp: change presentation, the station position or the viewing direction before assessing decoder settings.
For each trial, create a new tab or cell event, store the image and classify the failure cause. Retry only while the same item remains positively located. If an adjusted image decodes, validate the content against the expected cell or process record before releasing it. A clear image with a rejected identity requires a traceability investigation, not another focus adjustment. If the full code cannot be observed within the permitted motion and space, hold the item and resolve the mechanical coverage gap.
Swipe across the table to compare all columns →
| Observed evidence | Inspection decision | Action and retained record |
|---|---|---|
| The flat tab is sharp but the curled edge loses detail together with neighbouring surface features. | Focus-envelope problem is suspected. | Retain flat and curled crops, revise the qualified optical range and repeat motion and glare trials at the permitted geometric extremes. |
| A bright patch removes modules while surrounding detail remains sharp. | Glare limits visibility. | Compare angle and polarisation on the same mark, record available exposure and verify moving readability after any light reduction. |
| The code is partly behind a clamp, or decodes clearly but receives an identity rejection. | Different faults: unavailable geometry versus rejected content. | For obstruction, change presentation or hold. For rejection, preserve the clear image and event and reconcile the traceability response instead of refocusing. |
Test the extremes and preserve the reason for a hold
Build a sample matrix crossing tab curl, position, surface finish and motion. Test combinations such as the farthest curled edge under the least favourable reflection, rather than treating every variable independently. Retain module-detail crops as well as complete station images so a later no-read can be compared with the accepted setup.
Distinguish no image, unusable image, no decode and identity rejection in the interface. Clear the event when the item leaves; a delayed successful read from the previous tab must not release the next one. Code reading establishes identity within this workflow, not tab-weld quality or electrical connection.
Swipe across the table to compare all columns →
| Challenge | What to verify |
|---|---|
| Flat and curled tabs | Confirm the complete code remains visible. |
| Surface-finish variation | Measure glare-related no-reads. |
| Restricted machine clearance | Check the installed optical path and service access. |
| Missing trigger or no-read | Ensure the production record is not bound to stale data. |
Tab codes and installation clearances to provide
Provide marked tabs, curl limits, machine space, motion and the traceability interface.
Use the barcode verification grading guide to develop the next step.
Define the wider inspection responsibility in dpm code reading.
Translate these view and interface requirements into equipment choices with code reader selection.
Use the optical and recovery challenges above when applying the architecture choices in vision-system comparison guide.
Scope and budget
Use the vision system cost guide to scope constrained optical access, illumination and the traceability interface.
Testing and handover
Include tab curl, restricted views and a controlled retry sequence in the testing and handover process.