Application guide by addaScanCompare the inspection task, imaging conditions and validation steps with your own production line.
- Inspection task
- Battery packaging-film code reading
- Decision focus
- battery packaging-film code reading
- Station planning
- Use exposure changes to test a hypothesis
- Illustrative scenario
- decoding succeeds after several exposures
Code visibility on moving battery packaging film
The application images show the physical product and imaging conditions. The engineering diagram below explains the inspection logic and recovery decisions.
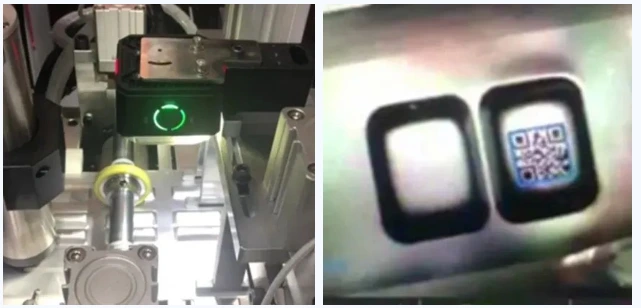
Installed reader and selected marked-film view.
Select an image to view it at full size.
Separate film-code printing faults from imaging failures
Swipe across the table to compare all columns →
| Condition | Approach to evaluate | Selection check |
|---|---|---|
| Identity capture | Evaluate decoding across film and print variation. | Retain no-read and wrong-read categories. |
| Human-readable content | Add OCR or expected-content verification where required. | A QR read does not verify every printed character. |
| Barcode quality requirement | Use the relevant verification method and standard. | Decoding tolerance is not a formal grade. |
Use exposure changes to test a hypothesis
Compare the same symbol under the candidate exposures or light directions. A highlight that shifts or shrinks while intact modules become visible indicates an imaging limitation. Merged modules that remain connected in clear views suggest excess ink; persistent gaps suggest a printing fault. Keep enough surrounding film context to distinguish the code from seams and repeated artwork.
Stop the acquisition sequence when the agreed evidence is obtained or the allowed station window ends. An unlimited search for any successful decode can hide deteriorating printing and disrupt product association. If print condition is part of the requirement, keep its decision independent from decoding success. A reader can return the intended string from a damaged symbol without demonstrating acceptable print quality.
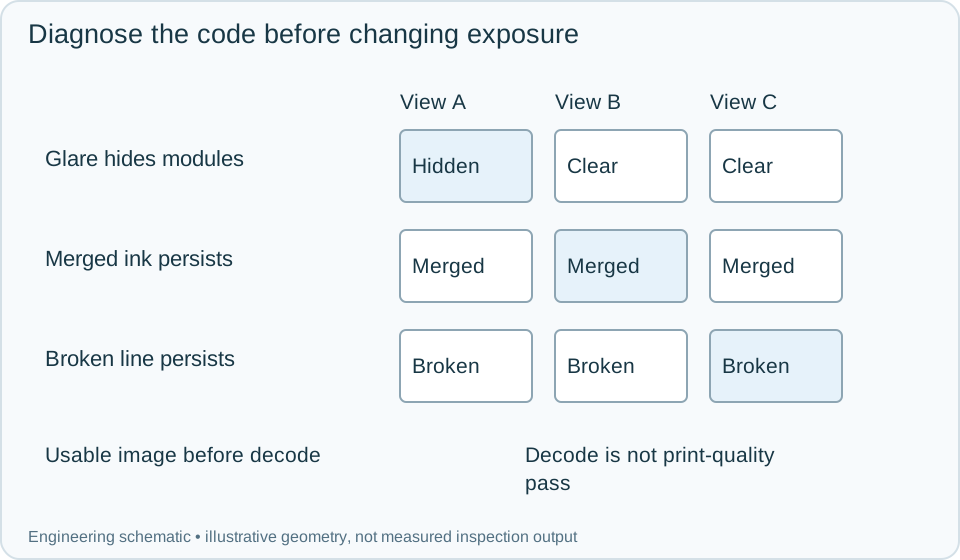
On a small screen, scroll across the diagram to inspect the labels.
Worked example: decoding succeeds after several exposures
In an illustrative pack, the first frame is washed out by glare. A qualified alternative exposure produces sharp modules and the expected string. Record the accepted exposure and content result, while retaining the earlier glare evidence for optical monitoring.
Another pack decodes but still shows merged ink regions that violate the agreed appearance rule. Reject or hold it for that reason; a successful string does not override the print decision. A third remains unreadable with broken modules in usable images. Segregate it and raise the appropriate printer investigation. Link the physical pack action to its event, and treat repeated imaging failures as a station-health issue rather than automatically blaming the printer. Any manual reread should preserve the initial result and the final disposition.
Swipe across the table to compare all columns →
| Observed evidence | Inspection decision | Action and retained record |
|---|---|---|
| A changed exposure reveals intact modules previously hidden by glare. | Imaging recovery, subject to content verification. | Retain the accepted exposure and original glare view, validate the returned string and monitor repeated retries as a separate station-health signal. |
| The symbol decodes but clear images show merged ink that violates the print rule. | Print-quality failure independent of successful decoding. | Keep the string and local ink evidence, reject or hold the pack and investigate printing without treating readability as formal grading. |
| Broken modules persist in usable images until the permitted acquisition window expires. | Unreadable printed symbol or damaged mark needs containment. | Record the image-validity and no-decode states, divert the identified pack and preserve its event through any authorised manual recovery. |
Keep production release and process alarms distinct
Validate normal film gloss, print-density variation, genuine missing lines, seams across the code and delayed exposure results. Record image-validity status, selected exposure, decoded content and print-fault reason.
A process alarm may warn of increasing exposure retries even while individual packs remain acceptable. Conversely, a pack can require rejection without proving a general printer fault. Use the observed evidence and the agreed production rules to separate those actions; formal barcode grading needs its own appropriate verification method.
Swipe across the table to compare all columns →
| Challenge | What to verify |
|---|---|
| Heavy and broken printing | Record how much normal variation remains readable. |
| Reflective and deformed film | Test moving images under actual exposure. |
| Wrong but readable code | Apply the expected identity rule. |
| Polling exceeds the decision window | Return an exception rather than a late stale pass. |
Printed film codes and pack variants for a trial
Provide both symbologies, worst normal print, film deformation, exposure limits and any required barcode standard.
Use the barcode verification grading guide to develop the next step.
Translate these view and interface requirements into equipment choices with code reader selection.
Define the wider inspection responsibility in ocr ocv code inspection.
Use the optical and recovery challenges above when applying the architecture choices in vision-system comparison guide.
Scope and budget
The vision system cost guide helps scope printed-film presentation, code decoding and any separate barcode-quality equipment.
Testing and handover
Use the testing and handover process to test film deformation and weak print while keeping decoding criteria separate from formal verification grades.